Installation Instructions
Android
Environment Setup
You can use Windows, Mac, or Linux desktop operating systems as your development environment. Please install the latest Android Studio development tools and Android SDK (which will be installed during the Android Studio installation process).
Prepare one or more Android phones or tablets, and enable "Developer Mode" to ensure they can be connected to the development environment computer via USB cable and recognized by Android Studio.
Note
Please note that the arctos links SDK cannot run in an emulator environment,
so you need to prepare an Android phone or tablet before use.
Installation Steps
The arctos links video SDK ZIP will include several aar files. Please move the aar files to a directory (e.g., libs) within the app folder of your Android Studio project.
Edit the app/build.gradle file to add dependencies on these aar files:
dependencies {
	// Dependency on arctos links SDK module
	implementation fileTree(include: ['*.aar'], dir: 'libs')
}
Then, sync the entire project from the File -> Sync Project with Gradle Files option to start development.
You can also refer to the sample application we provide.
iOS
Preparation
Please ensure the following items are installed:
- Xcode 15+ (version depends on the annual release on the Apple Developer website)
Ensure your project meets the following requirements:
Developer account related:
Apply for an Apple Developer account. If you don't have one, please apply on the Apple Developer official website. After completion, it is usually a "free version" developer account.
Ensure your developer account is either "individual paid version" or "company organization version". If it is a "free version developer", please apply for your "individual paid version" or apply to join the "company organization version" as a team developer at Apple Developer Programs.
Your project must specify the following platform versions or newer:
iOS 14+
iPadOS 14+
The current version does not support the following platforms:
❌Simulator
❌macOS
❌tvOS
❌watchOS
Pre-step 1: Create an App Project in Xcode
Note
If it is an existing old project, please skip to Pre-step 2
For a new project, the following is an example of creating a new project named SDKSampleApp in Xcode 15.2, as shown in the figure:
Pre-step 2: Check Environment Setup
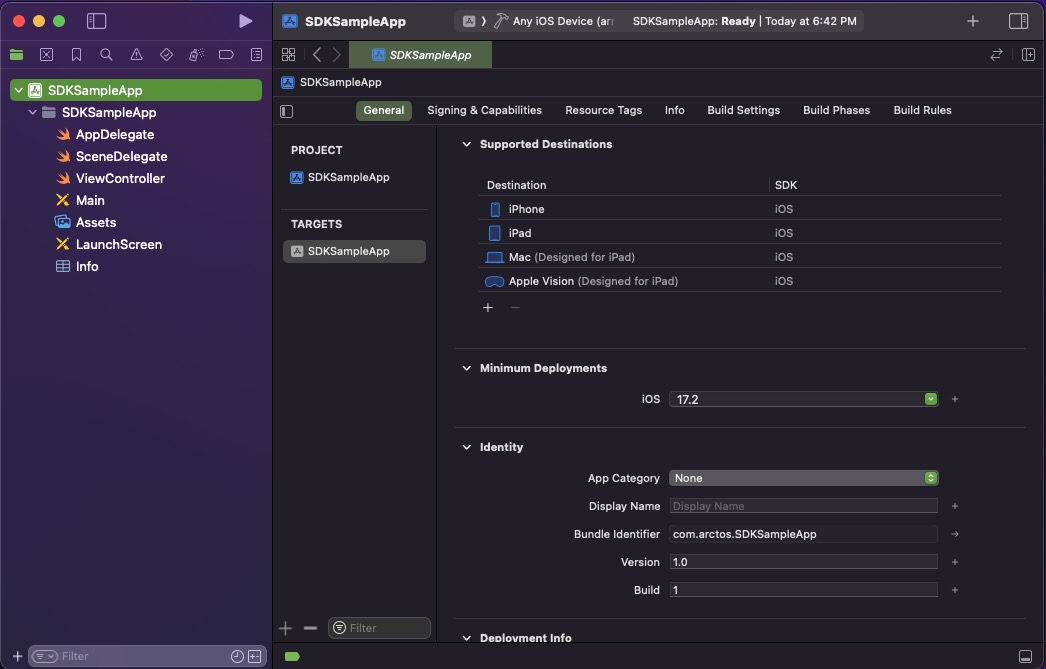
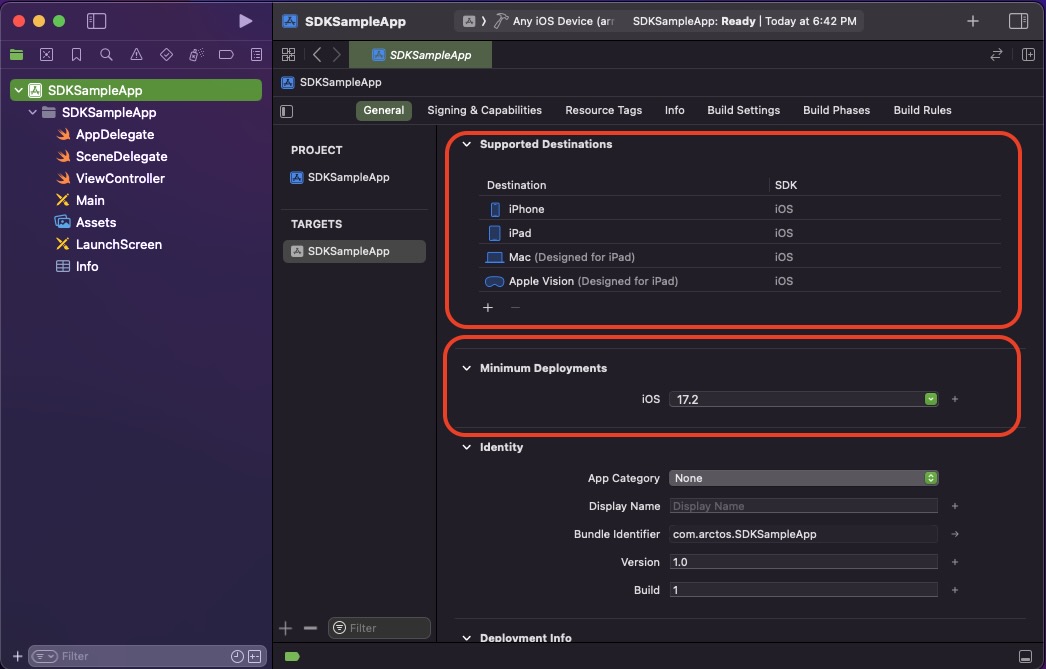
Check project TARGETS -> General settings
Supported Destinations -> iPhone (and iPad)
Minimum Deployments -> Adjust to iOS 14.0+

Check project TARGETS -> Signing & Capabilities settings
- Add Background Modes -> ✅Audio, AirPlay, and Picture in Picture
Note
  The SDK uses the device's built-in microphone for audio recording.
  Enable Audio, AirPlay,
  and Picture in Picture to allow the app to run in the background.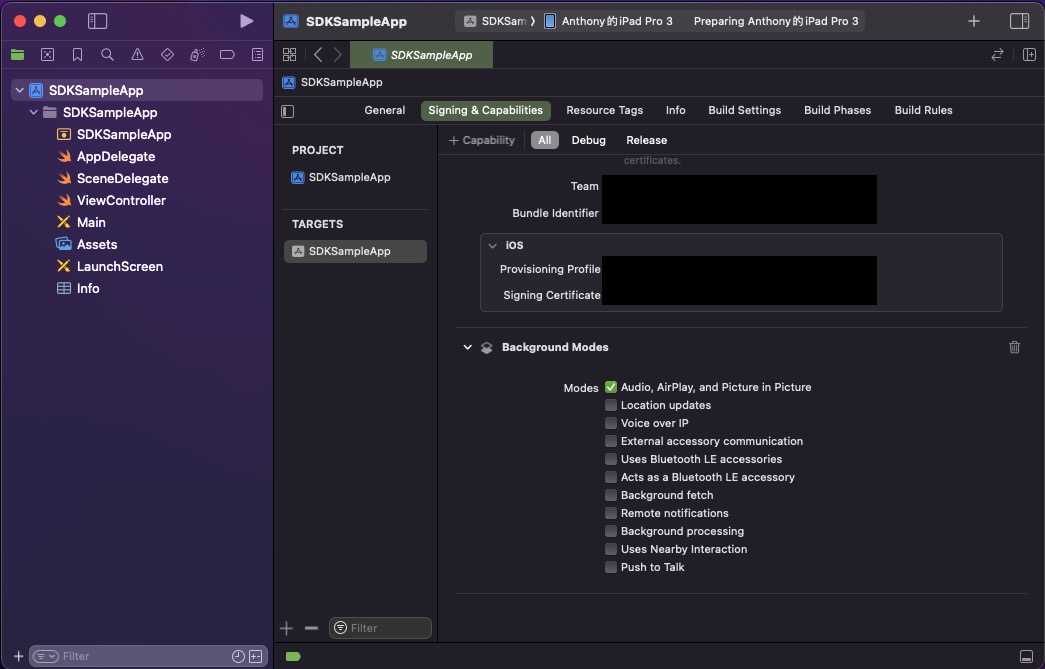
Check project TARGETS -> Info settings -> Custom iOS Target Properties and add the following permissions
Privacy - Camera Usage Description
Privacy - Microphone Usage Description
Note
The SDK uses the device's built-in camera and microphone for audio recording. According to the official app design guidelines, relevant permissions must be provided for the app to run smoothly.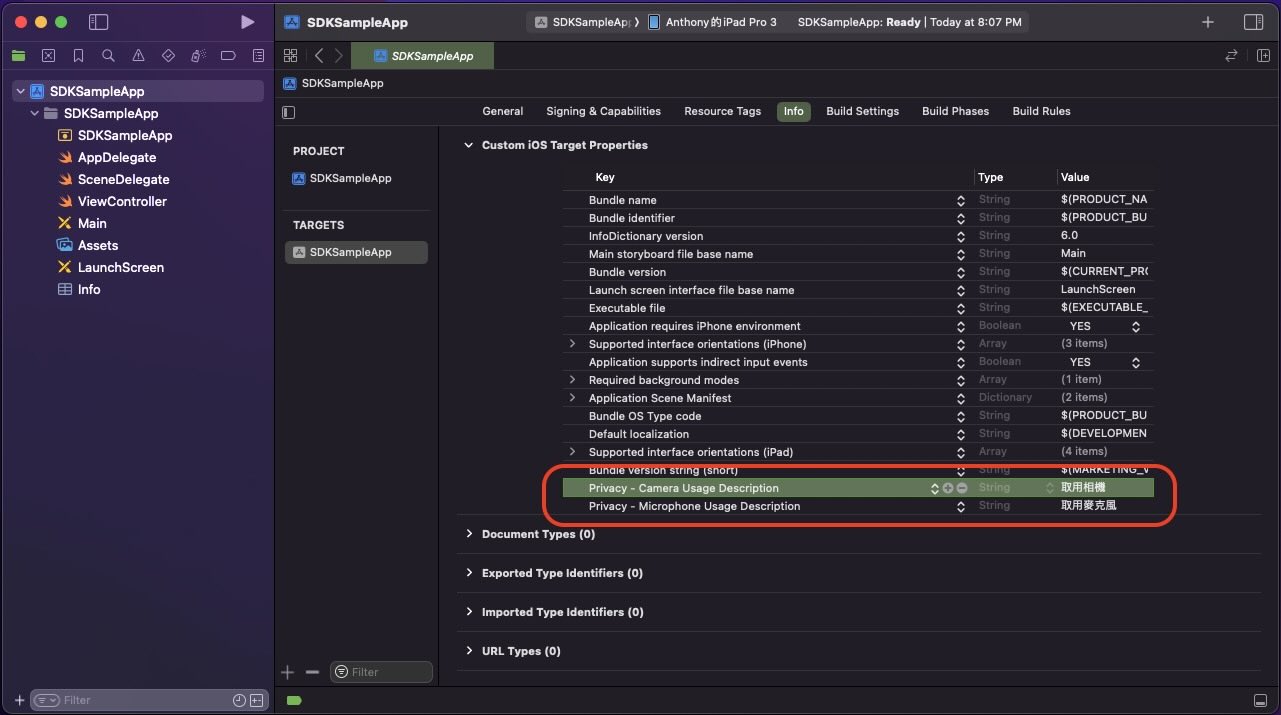
Installation Methods - Choose either Manual (.zip file) or Swift Package Manager (SPM)
Manual (zip file)
Obtain the arctos links video SDK (.zip file) provided by us, which includes the following
.xcframeworkfiles:ArctosLinks.xcframework(main framework)ArctosCarrier.xcframework(ArctosLinks dependency framework)libyuv.xcframework(ArctosLinks dependency framework)RxSwift.xcframework(ArctosLinks dependency framework)RxCocoa.xcframework(RxSwift extension framework, not used by ArctosLinks)RxRelay.xcframework(RxSwift extension framework, not used by ArctosLinks)RxTest.xcframework(RxSwift extension framework, not used by ArctosLinks)RxBlocking.xcframework(RxSwift extension framework, not used by ArctosLinks)
CocoaMQTT.xcframework(ArctosLinks dependency framework)MqttCocoaAsyncSocket.xcframework(CocoaMQTT dependency framework)Starscream.xcframework(CocoaMQTT dependency framework)
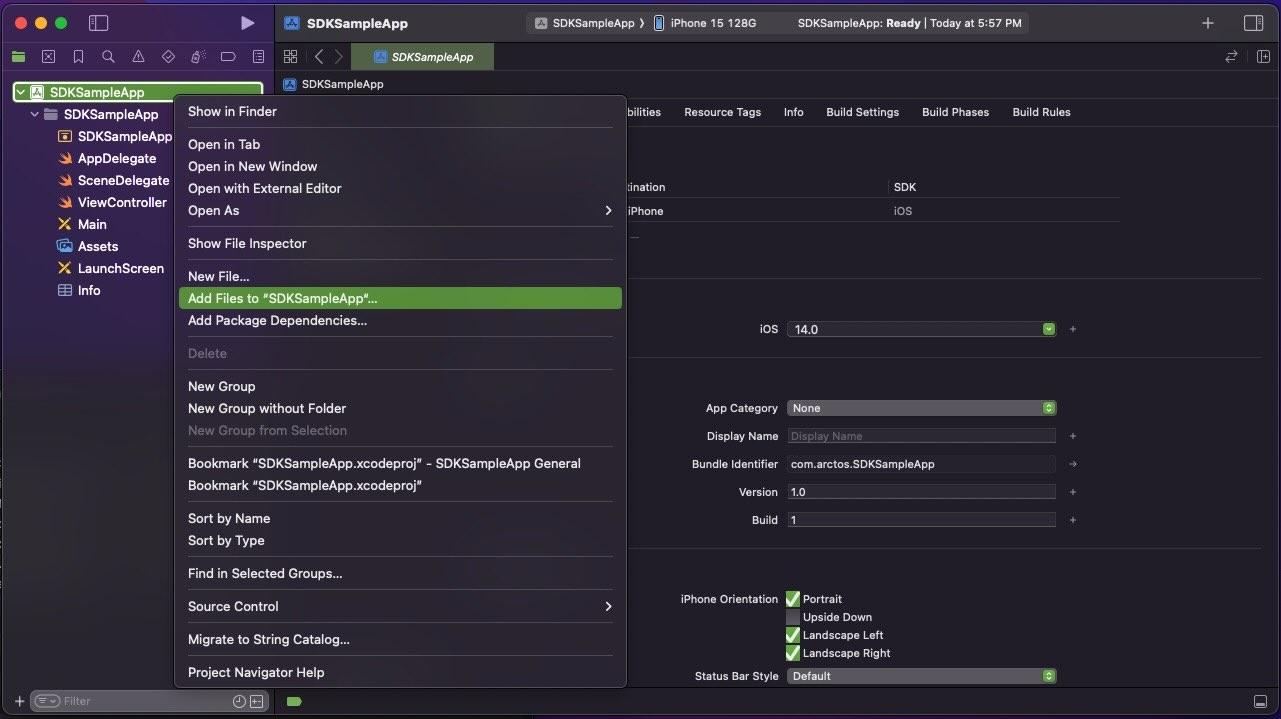
Import the SDK .xcframework binary files provided by us. Right-click on the project name -> Add Files to "SDKSampleApp"...
After selecting the relevant
.xcframeworkfiles, make sure to check ✅Copy items if needed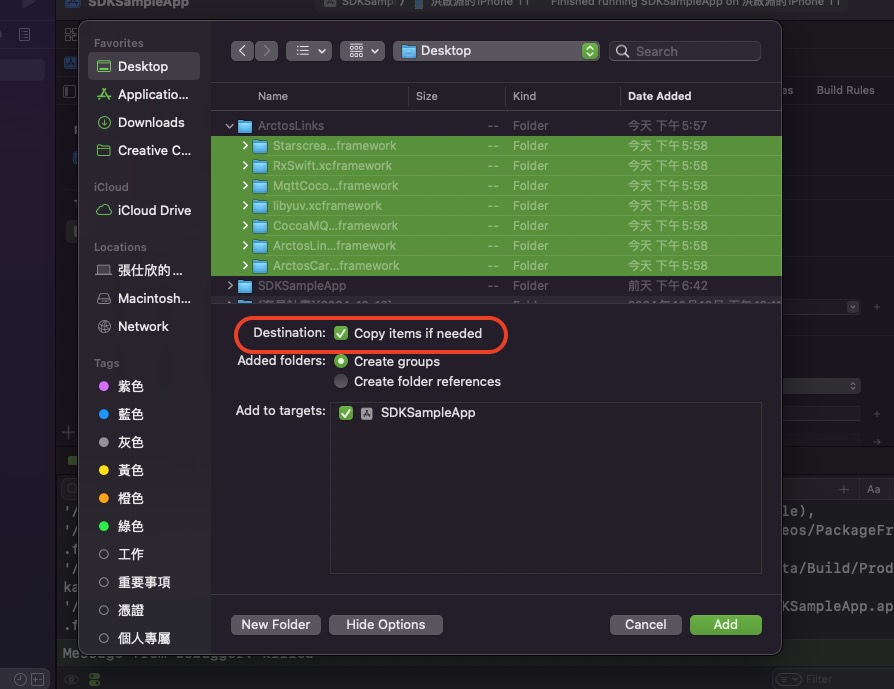
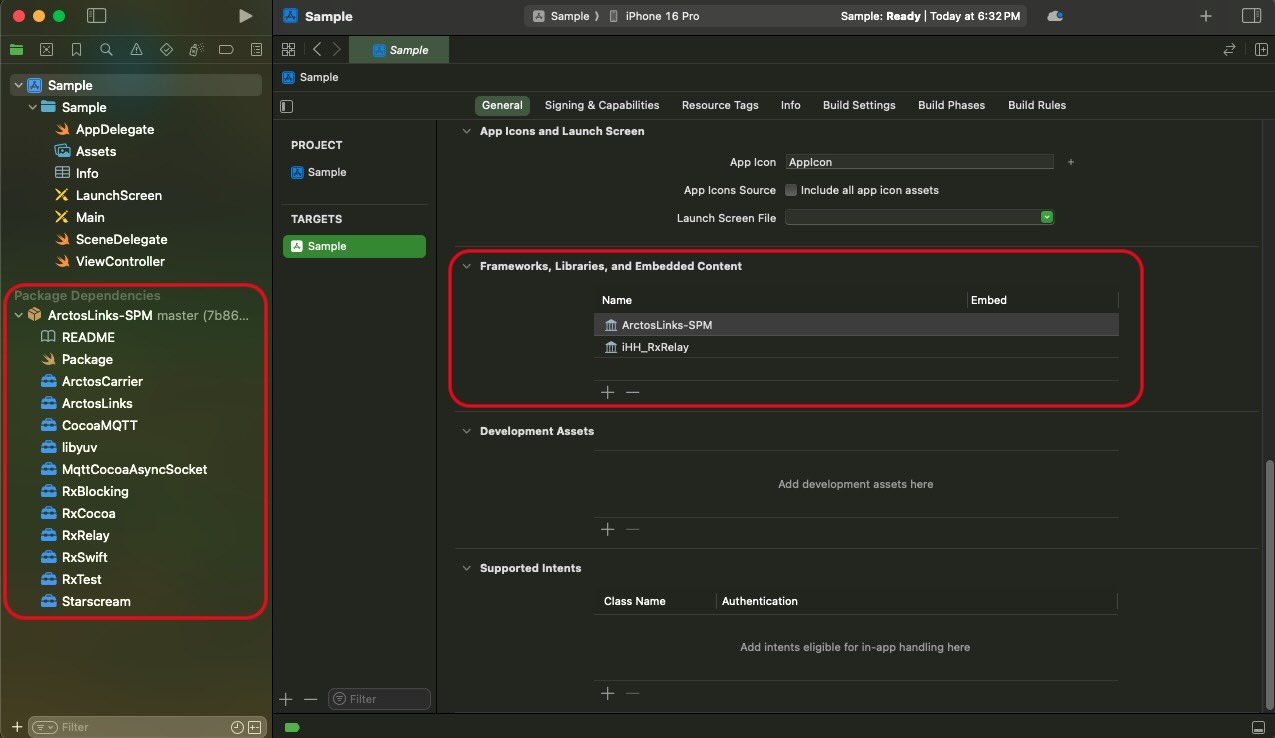
After adding, check TARGETS -> General -> Frameworks, Libraries, and Embedded Content to ensure all newly added
.xcframeworkfiles are in the Embed & Sign state, as shown in the figure: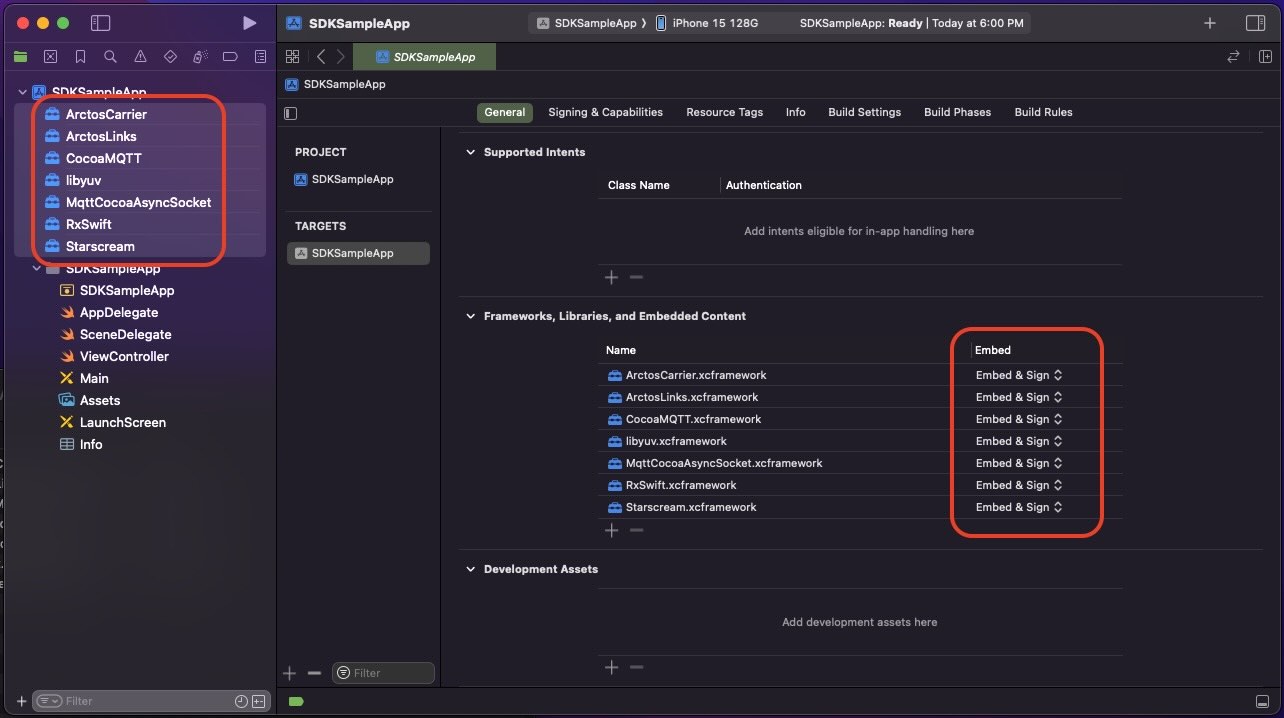
Swift Package Manager (SPM)
Obtain the following information provided by us to install via Swift Package Manager (SPM) in Xcode
GitLab DomainAccountAccess TokenProject URL
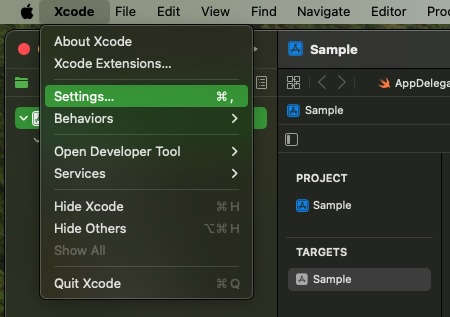
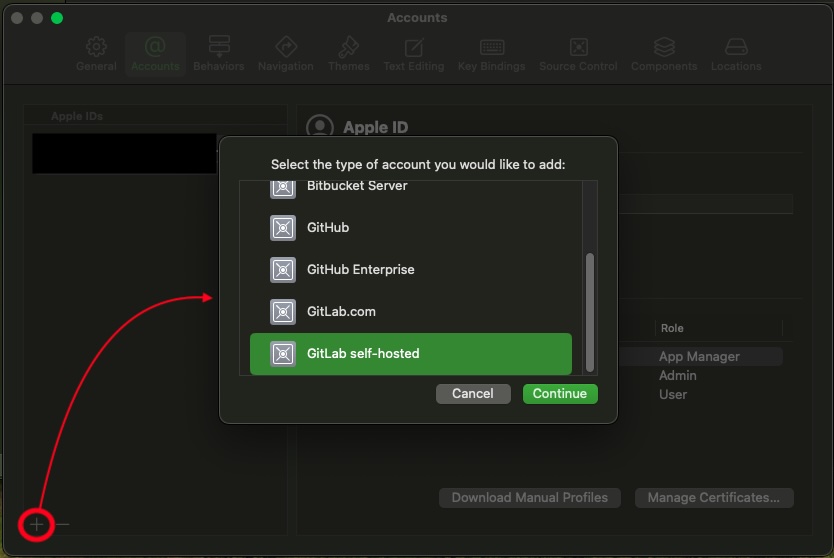
In Xcode, go to Settings.. -> Account -> bottom left + -> GitLab self-hosted, as shown in the figure:
Enter the
GitLab Domain,Account, andAccess Tokenprovided by us for verification, as shown in the figure: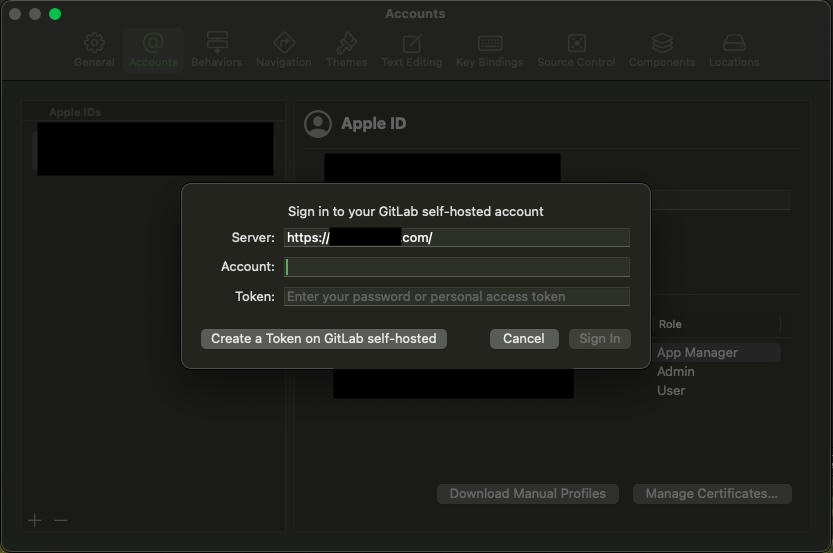
Click on the project name .xcproject -> PROJECT -> Package Dependencies -> bottom left +
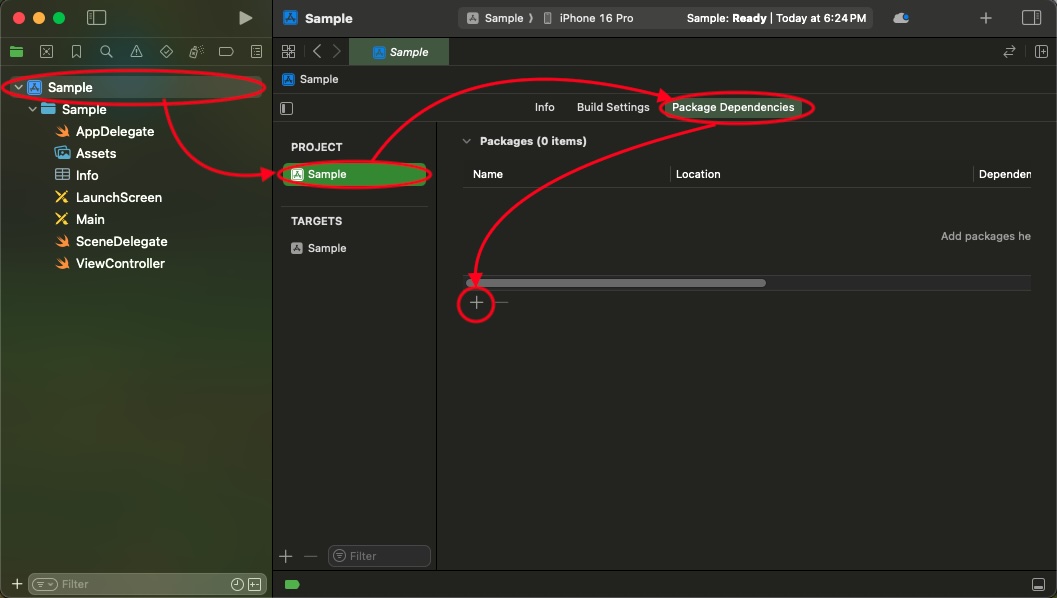
Enter the
Project URLprovided by us -> After verification, the corresponding SDK will appear -> Click Add Package in the bottom right corner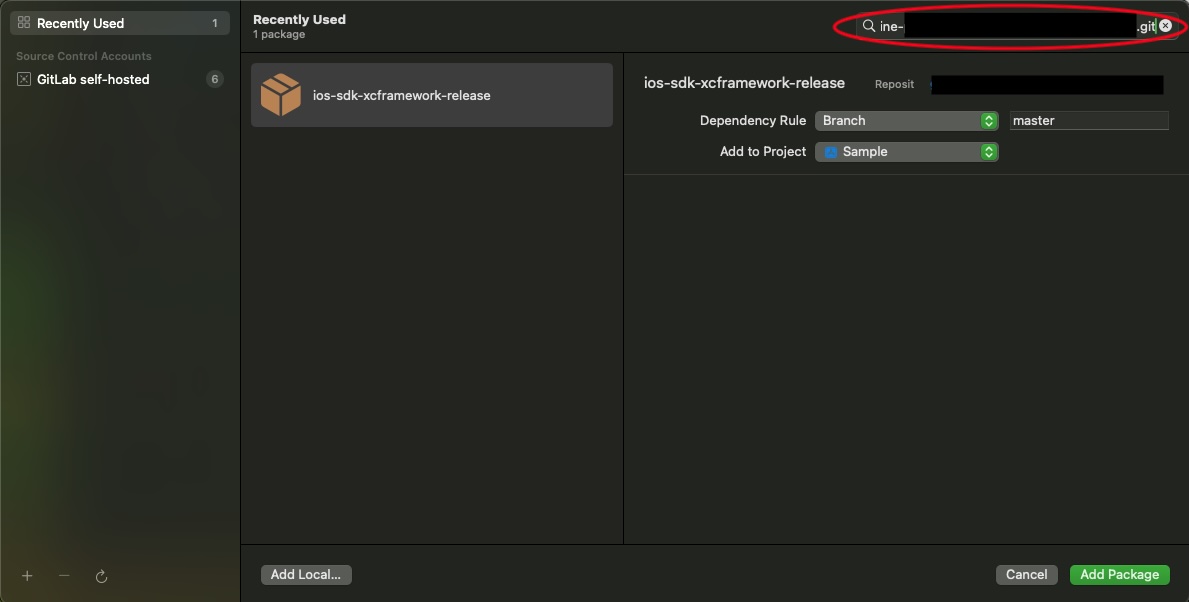
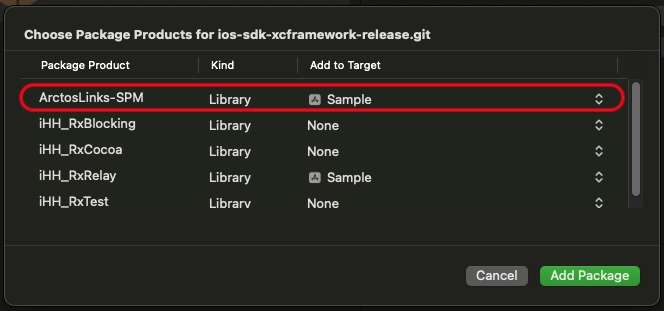
After adding, several Package Products will be provided. Generally, select
ArctosLinks-SPMto add, as shown in the figure:ArctosLinks-SPM(main framework)iHH_RxBlocking(optional, for resolving compilation conflicts for developers using RxBlocking in the original project)iHH_RxCocoa(optional, for resolving compilation conflicts for developers using RxBlocking in the original project)iHH_RxRelay(optional, for resolving compilation conflicts for developers using RxBlocking in the original project)iHH_RxTest(optional, for resolving compilation conflicts for developers using RxBlocking in the original project)
Initialize SDK
For specific usage, please refer to the chapter Usage for initial setup.
Common Issues with Package Management
Cause
The SDK solutions provided by us all use Carthage integration, pre-compiling our core technology ArctosLinks and other public technologies into
.xcframeworkdynamic binary packages for management. ArctosLinks-SPM is also packaged as SPM for release. The public packages used are as follows:GitHub CocoaMQTT, Note: CocoaMQTT has naming conflicts in its source code, which we have handled separately.
The reason for using
.xcframeworkis that it has the following advantages:Lightweight and simple integration
Does not integrate third-party source code into the project directory, unlike CocoaPods and Swift Package Manager, but rather uses simple
.xcframeworkfiles, allowing developers to manually add files to the project.Friendly to Xcode environment
No additional scripts are needed to manage dependencies (such as Pods.xcodeproj files). This keeps the Xcode project environment structure simple, independent, and less intrusive.
Improves project compilation efficiency
.xcframeworkis a pre-compiled binary library, meaning it does not need to be recompiled during project compilation, significantly improving development efficiency and saving build time for projects using multiple third-party packages.Security and static scanning
Static scanning is not for the project itself but depends on the project's application field, enterprise system, regulations, etc. For example, military, medical, financial fields, etc., require static scanning to verify code security and compliance.
.xcframeworkis a binary library, not source code, so it is not affected by static scanning regulations, making it easier for developers to handle subsequent issues in scanning.
Although
.xcframeworkhas many advantages, there are still drawbacks in actual development that need to be balanced. For example, if the project itself uses some third-party packages that depend on other public packages, there may be issues with duplicate references. Suppose "Package A internally references Package C" and "Package B internally references Package C". A and B are independent but both reference C internally, causing compilation issues due to duplicate references. Additionally, different integration methods for duplicate packages can also cause compilation difficulties in the project.Currently, there are at least three known package management methods: CocoaPods, Swift Package Manager, and Carthage. If mixed integration methods cause issues, it can be quite troublesome for developers to resolve. To address this, we provide additional solutions for developers.
This is the issue caused by the simultaneous presence of
RxSwift.xcframeworkand GitHub SPM RxSwift, resulting in compilation and runtime issues ⬇️
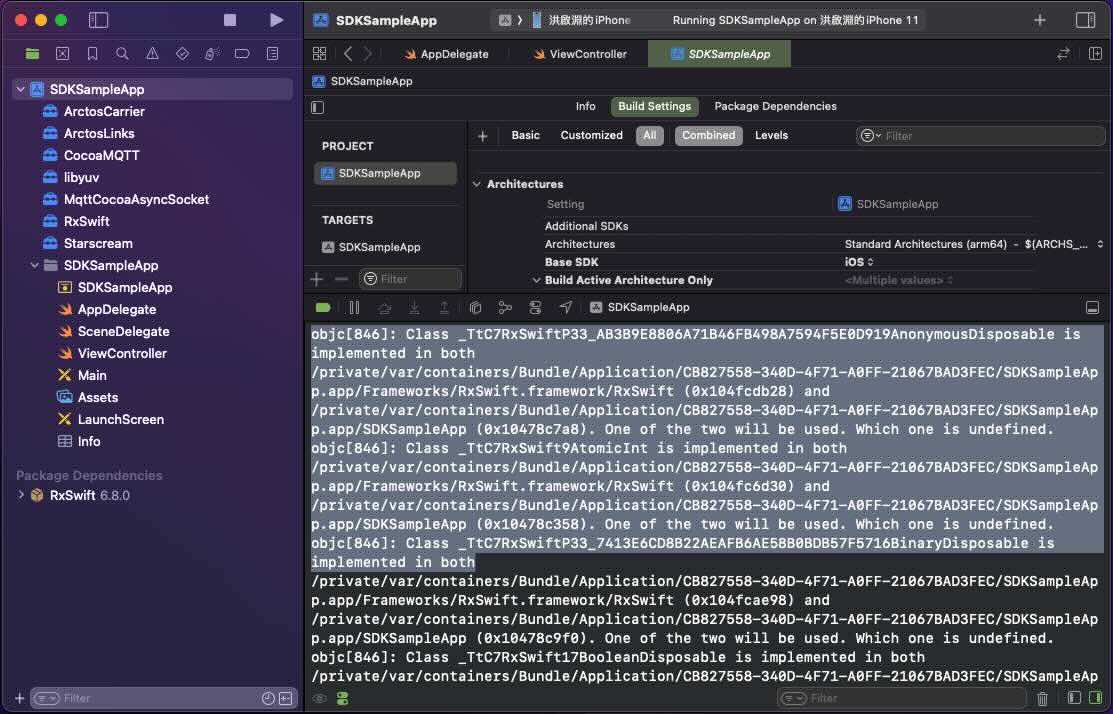
CocoaPods, Swift Package Manager Duplicate Package Reference Conflicts
Please remove the relevant Pods content for CocoaMQTT, RxSwift with the same name from your existing project, and follow the instructions below based on your installation method:
Manual (.zip file)
- If your original project also uses RxSwift extensions such as RxCocoa, RxRelay, etc., please reference the corresponding Rx____.xcframework provided by us, for example, if using RxRelay, add RxRelay.xcframework as a replacement.
Swift Package Manager (SPM)
- If your original project also uses RxSwift extensions such as RxCocoa, RxRelay, etc., please add the corresponding iHH_Rx____ Package Product provided by us, for example, if using RxRelay, add iHH_RxRelay as a replacement.
CocoaMQTT Package Conflict
GitHub CocoaMQTT has naming conflicts in its source code, which need to be adjusted separately.
Similarly, remove the GitHub CocoaMQTT managed by Pods or SPM in your existing project.
This step requires developers to manually adjust the project code and rename the
CocoaMQTTobject toCocoaMQTT3. Example code is as follows:
import CocoaMQTT

class MQTTAccessTool: NSObject {
	// private var mqtt: CocoaMQTT?  <== Change to CocoaMQTT3?, as shown in the next line
	private var mqtt: CocoaMQTT3?
}

extension MQTTAccessTool: CocoaMQTTDelegate {
	// func mqtt(_ mqtt: CocoaMQTT, didConnectAck ack: CocoaMQTTConnAck) {  <== Change to CocoaMQTT3?, as shown in the next line
	func mqtt(_ mqtt: CocoaMQTT3, didConnectAck ack: CocoaMQTTConnAck) {

	}
}
References
Windows (C++ with Qt6)
Project Setup
- Install Qt6, which can be obtained via Qt creator prebuilt or build from source
- Install the Qt Visual Studio Tools extension for Visual Studio 2022
- Extensions -> Manage Extensions -> Browse -> Search for Qt Visual Studio Tools -> Install
- Create a QML project
- Import the arctos links Windows SDK (Release Mode)
- Add include directories
- Add additional library directories
- Add references to the libraries in the SDK/lib The above steps can be referenced from the Visual Studio Demo APP project setup.